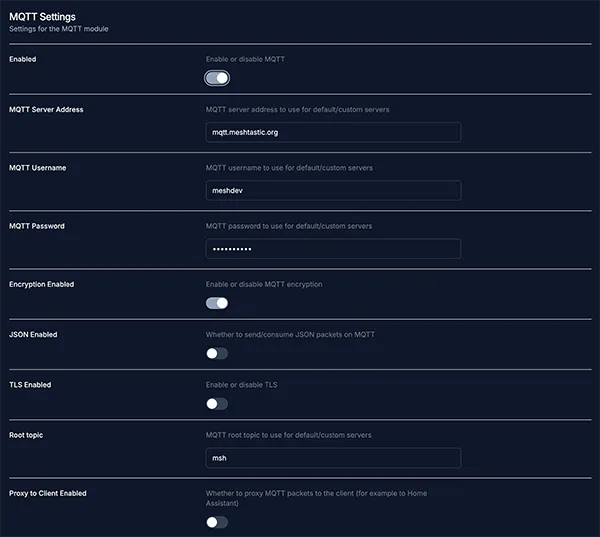
MQTT Module Configuration
If your device is connected to Internet via wifi or ethernet, you can enable it to forward packets along to an MQTT server. This allows users on the local mesh to communicate with users on the internet. One or more channels must also be enabled as uplink and/or downlink for packets to be transmitted from and/or to your mesh (See channels).
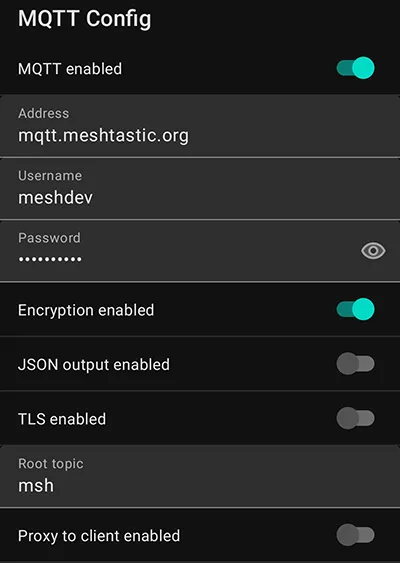
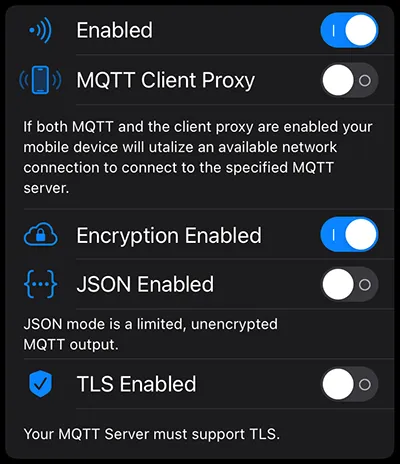
The MQTT module config options are: Enabled, Server Address, Username, Password, Encryption Enabled, JSON Enabled, TLS Enabled, Root Topic, Client Proxy Enabled, Map Reporting Enabled (with Position Precision and Publish Interval), and Okay to MQTT. MQTT Module config uses an admin message sending a ConfigModule.MQTT protobuf.
Settings
MQTT Module Config Values
Enabled
Enables the MQTT module.
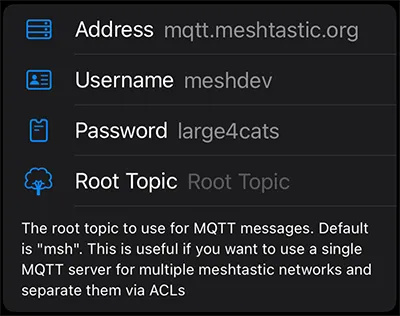
Server Address
The server to use for MQTT. If not set, the default public server will be used.
Username
MQTT Server username to use (most useful for a custom MQTT server). If using a custom server, this will be honored even if empty. If using the default public server, this will only be honored if set; otherwise, the device will use the default username.
Password
MQTT password to use (most useful for a custom MQTT server). If using a custom server, this will be honored even if empty. If using the default server, this will only be honored if set; otherwise, the device will use the default password.
Encryption Enabled
Whether to send encrypted or unencrypted packets to the MQTT server. Unencrypted packets may be useful for external systems that want to consume meshtastic packets.
Note: All messages are sent to the MQTT broker unencrypted if this option is not enabled, even when your uplink channels have encryption keys set.
JSON Enabled
JSON is not supported on the nRF52 platform.
Enable the sending / consumption of JSON packets on MQTT. These packets are not encrypted, but offer an easy way to integrate with systems that can read JSON.
TLS Enabled
If true, we attempt to establish a secure connection using TLS.
Root Topic
The root topic to use for MQTT messages. This is useful if you want to use a single MQTT server for multiple meshtastic networks and separate them via ACLs.
Client Proxy Enabled
If true, let the device use the client's (e.g. your phone's) network connection to connect to the MQTT server. If false, it uses the device's network connection which you have to enable via the network settings.
Map Reporting Enabled
Available from firmware version 2.3.2 on. If true, your node will periodically send an unencrypted map report to the MQTT server to be displayed by online maps that support this packet. This report includes the following information:
- The node's long and short name and ID;
- The node's position (with configurable precision) and altitude;
- The node's hardware model and role;
- The node's firmware version;
- The node's LoRa region, modem preset and primary channel name;
- Whether the node can be reached on the default channel with known key;
- Number of local online nodes (heard in the last 2 hours, excluding those heard via MQTT).
Map Report Position Precision
The precision to use for the position in the map report. Defaults to a maximum deviation of around 1459m.
Map Report Publish Interval
How often we should publish the map report to the MQTT server in seconds. Defaults to 3600 seconds (1 hour), which is also the minimum value.
MQTT Module Config Client Availability
- Android
- Apple
- CLI
- Web
Android
MQTT Config options are available for Android.
- Open the Meshtastic App
- Navigate to: Settings > MQTT
Apple
All MQTT config options are available on iOS, iPadOS and macOS at Settings > Module Configuration > MQTT.
CLI
The following configuration options are available in the Python CLI:
| Setting | Acceptable Values | Default |
|---|---|---|
| mqtt.enabled | true, false | false |
| mqtt.address | string | mqtt.meshtastic.org |
| mqtt.username | string | meshdev |
| mqtt.password | string | large4cats |
| mqtt.encryption_enabled | true, false | false |
| mqtt.json_enabled | true, false | false |
| mqtt.tls_enabled | true, false | false |
| mqtt.root | string | |
| mqtt.proxy_to_client_enabled | true, false | false |
| mqtt.map_reporting_enabled | true, false | false |
Because the device will reboot after each command is sent via CLI, it is recommended when setting multiple values in a config section that commands be chained together as one.
meshtastic --set mqtt.enabled true --set mqtt.json_enabled true
meshtastic --set mqtt.enabled true
meshtastic --set mqtt.enabled false
meshtastic --set mqtt.json_enabled true
meshtastic --set mqtt.json_enabled false
Web
All MQTT module config options are available for the Web UI.
Connect to the Default Public Server
The default channel (LongFast) on the public server usually has a lot of traffic. Your device may get overloaded and may no longer function properly anymore. It is recommended to use a different channel or to use your own MQTT server if you experience issues.
- Android
- Apple
- CLI
- Web
Android
1. Enable the MQTT Module
Navigate to: Settings > MQTT: Turn on the slider for MQTT enabled and tap Send.
Optional: To use your phone's internet connection to send and receive packets over the web, also enable the slider for MQTT Client Proxy and skip the Configure Network Settings step below.
2. Enable Channel Uplink & Downlink
Navigate to: Settings > Channels > LongFast: Turn on the sliders for Uplink enabled and Downlink enabled, then tap Save and tap Send.
3. Configure Network Settings
Navigate to: Settings > Network: Turn on the slider for WiFi enabled, Enter the SSID and PSK for your network, then tap Send.
Apple
1. Enable the MQTT Module
Navigate to Settings > MQTT: Turn on the slider for MQTT enabled and tap Save
Optional: To use your phone's internet connection to send and receive packets over the web, also enable the slider for MQTT Client Proxy and skip the Configure Network Settings step below.
2. Enable Channel Uplink & Downlink
Navigate to Settings > Channels > Primary Channel: Turn on the sliders for Uplink enabled and Downlink enabled - Tap Save
3. Configure Network Settings
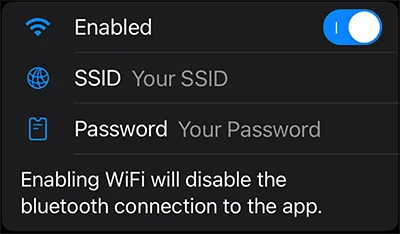
Navigate to Settings > Network: Turn on the slider for WiFi enabled - Enter your SSID and PSK for your network - Tap Save
CLI
1. Enable the MQTT Module
meshtastic --set mqtt.enabled true
2. Enable Channel Uplink & Downlink
meshtastic --ch-set uplink_enabled true --ch-index 0
meshtastic --ch-set downlink_enabled true --ch-index 0
or chained together:
meshtastic --ch-set uplink_enabled true --ch-index 0 --ch-set downlink_enabled true --ch-index 0
3. Configure Network Settings
meshtastic --set network.wifi_enabled true
meshtastic --set network.wifi_ssid "your network"
meshtastic --set network.wifi_psk yourpassword
or chained together:
meshtastic --set network.wifi_enabled true --set network.wifi_ssid "your network" --set network.wifi_psk yourpassword
Web
1. Enable the MQTT Module
Navigate to Config > Module Config > MQTT - Turn on the slider for MQTT enabled - Click the Save icon.
Optional: To use your client's internet connection to send and receive packets over the web, also enable the slider for Proxy to Client Enabled and skip the Configure Network Settings step below.
Though this option may be visible in your UI, Client Proxy is not yet functional with the Web Client.
2. Enable Channel Uplink & Downlink
Navigate to Channels > Primary: Turn on the sliders for Uplink Enabled and Downlink Enabled - Click the Save icon.
3. Configure Network Settings
Navigate to Radio Config > Device > Network: Turn on the slider for Enabled - Enter your SSID and PSK for your network - Click the Save icon.
