Home Assistant
Home Assistant Integrations for Meshtastic
Due to a known issue with nRF52 devices and JSON, nRF52 devices are not supported for use with Home Assistant at this time.
Integrating Meshtastic into Home Assistant brings a new level of control and monitoring to your mesh network. On this page, we'll guide you through the process of creating Meshtastic MQTT sensor entities within Home Assistant. Whether you want to keep an eye on battery levels, environmental conditions, or even receive notifications from your mesh network, these integrations provide you with the tools to make it happen.
It is highly recommended to download MQTT Explorer for analyzing the JSON threads that come across the broker. This can be downloaded here http://mqtt-explorer.com/.
Create Meshtastic MQTT Sensor Entities
-
Ensure your mesh unit is connected to your MQTT broker and using JSON as an output.
-
Open configuration.yaml and include the following line:
mqtt: !include mqtt.yaml
-
Create a new text file called
mqtt.yamlin the root directory of home assistant (the same folder as configuration.yaml). -
Copy the following code to the mqtt.yaml file.
Default Node Telemetry Example
sensor:

# Node #1

  - name: "Node 1 Battery Voltage"
    unique_id: "node_1_battery_voltage"
    state_topic: "msh/US/2/json/LongFast/!67ea9400"
    state_class: measurement
    value_template: >-
      {% if value_json.from == 4038675309 and
            value_json.payload.voltage is defined and
            value_json.payload.temperature is not defined %}
        {{ (value_json.payload.voltage | float) | round(2) }}
      {% else %}
        {{ this.state }}
      {% endif %}
    unit_of_measurement: "Volts"
    # Telemetry packets come in two flavors: The default node telemetry, and the I2C sensor data.
    # Both packets contain "voltage" so we check for temperature to ignore the sensor packet here.

  - name: "Node 1 Battery Percent"
    unique_id: "node_1_battery_percent"
    state_topic: "msh/US/2/json/LongFast/!67ea9400"
    state_class: measurement
    value_template: >-
      {% if value_json.from == 4038675309 and value_json.payload.battery_level is defined %}
        {{ (value_json.payload.battery_level | float) | round(2) }}
      {% else %}
        {{ this.state }}
      {% endif %}
    device_class: "battery"
    unit_of_measurement: "%"

  - name: "Node 1 ChUtil"
    unique_id: "node_1_chutil"
    state_topic: "msh/US/2/json/LongFast/!67ea9400"
    state_class: measurement
    value_template: >-
      {% if value_json.from == 4038675309 and value_json.payload.channel_utilization is defined %}
        {{ (value_json.payload.channel_utilization | float) | round(2) }}
      {% else %}
        {{ this.state }}
      {% endif %}
    unit_of_measurement: "%"

  - name: "Node 1 AirUtilTX"
    unique_id: "node_1_airutiltx"
    state_topic: "msh/US/2/json/LongFast/!67ea9400"
    state_class: measurement
    value_template: >-
      {% if value_json.from == 4038675309 and value_json.payload.air_util_tx is defined %}
        {{ (value_json.payload.air_util_tx | float) | round(2) }}
      {% else %}
        {{ this.state }}
      {% endif %}
    unit_of_measurement: "%"
Telemetry Module Entities
- If you have environmental sensors installed, create entities for these by including some or all of the following blocks:
  - name: "Node 1 Temperature"
    unique_id: "node_1_temperature"
    state_topic: "msh/US/2/json/LongFast/!67ea9400"
    state_class: measurement
    value_template: >-
      {% if value_json.from == 4038675309 and value_json.payload.temperature is defined %}
        {{ (((value_json.payload.temperature | float) * 1.8) +32) | round(2) }}
      {% else %}
        {{ this.state }}
      {% endif %}
    device_class: "temperature"
    unit_of_measurement: "°F"
# With device_class: "temperature" set, make sure to use the configured unit for temperature in your HA instance.
# If you don't, then non-temperature messages will change the value of this sensor by reinterpreting the current state with the wrong unit, unless you account for it.
# For Celsius use:    {{ (value_json.payload.temperature | float) | round(1) }}
# For Fahrenheit use: {{ (((value_json.payload.temperature | float) * 1.8) +32) | round(2) }}

  - name: "Node 1 Humidity"
    unique_id: "node_1_humidity"
    state_topic: "msh/US/2/json/LongFast/!67ea9400"
    state_class: measurement
    value_template: >-
      {% if value_json.from == 4038675309 and value_json.payload.relative_humidity is defined %}
        {{ (value_json.payload.relative_humidity | float) | round(2) }}
      {% else %}
        {{ this.state }}
      {% endif %}
    device_class: "humidity"
    unit_of_measurement: "%"

  - name: "Node 1 Pressure"
    unique_id: "node_1_pressure"
    state_topic: "msh/US/2/json/LongFast/!67ea9400"
    state_class: measurement
    value_template: >-
      {% if value_json.from == 4038675309 and value_json.payload.barometric_pressure is defined %}
        {{ (value_json.payload.barometric_pressure | float) | round(2) }}
      {% else %}
        {{ this.state }}
      {% endif %}
    device_class: "pressure"
    unit_of_measurement: "hPa"
# With device_class: "pressure" set, make sure to use the configured unit for pressure in your HA instance.
# For psi use:    {{ ((value_json.payload.barometric_pressure | float) / 68.9475729) | round(2) }}

  - name: "Node 1 Gas Resistance"
    unique_id: "node_1_gas_resistance"
    state_topic: "msh/US/2/json/LongFast/!67ea9400"
    state_class: measurement
    value_template: >-
      {% if value_json.from == 4038675309 and value_json.payload.gas_resistance is defined %}
        {{ (value_json.payload.gas_resistance | float) | round(2) }}
      {% else %}
        {{ this.state }}
      {% endif %}
    unit_of_measurement: "MOhms"
Message Entities
- For added functionality you can create an entity for messages received from a node:
  - name: "Node 1 Messages"
    unique_id: "node_1_messages"
    state_topic: "msh/US/2/json/LongFast/!67ea9400"
    value_template: >-
      {% if value_json.from == 4038675309 and value_json.payload.text is defined %}
        {{ value_json.payload.text }}
      {% else %}
        {{ this.state }}
      {% endif %}
Maps & Device Tracker
To make it possible for your nodes to appear in maps within Home Assistant, you will need to set up a device_tracker entity. Luckily, Home Assistant allows them to be created ad-hoc, simply by calling the device_tracker.see service from a script or automation.
To do this, create a new automation and use the three-dots menu to change to the "Edit in YAML" mode, and set it up like the following:
alias: Update Node 1 location
description: Update Meshtastic node when corresponding MQTT messages are seen.
trigger:
  - platform: mqtt
    topic: msh/US/2/json/LongFast/!67ea9400
    payload: "on"
    value_template: |-
      {% if value_json.from == 4038675309 and
            value_json.payload.latitude_i is defined and
            value_json.payload.longitude_i is defined %}on{% endif %}
condition: []
action:
  - service: device_tracker.see
    metadata: {}
    data:
      dev_id: node_1
      gps:
        - "{{ (trigger.payload | from_json).payload.latitude_i | int * 1e-7 }}"
        - "{{ (trigger.payload | from_json).payload.longitude_i | int * 1e-7 }}"
      battery: "{{ states('sensor.node_1_battery_percent')|float(0) }}"
mode: single
The dev_id within the service call determines what the device_tracker entity will be called, for example device_tracker.node_1 for the above. Make sure that you have different names in this field for your different nodes, or they will all show up under the same tracker! Meshtastic represents latitude and longitude in integers, which is why they must be multiplied by 1e-7 to produce the real location.
Device trackers can also support a few different additional fields, but the one most relevant to Meshtastic usage is the battery level, which can be pulled in from the previously-created sensors as shown.
Additional Entities
Home Assistant entities can be created for any data type that is published to MQTT. For example: altitude, latitude_i, longitude_i, time, current, and neighbors. Use the templates above as a guide to create additional entities if desired.
Configure With Your Topic & Node ID's
-
In every entity, replace
msh/US/2/json/LongFast/!67ea9400with the topic your node publishes to. In this example,!67ea9400refers to the node that has mqtt enabled on the mesh and is publishing to the broker. -
In every entity replace
4038675309with the node number of the radio you wish to monitor. In this example4038675309is the node on the mesh with environment sensors and telemetry that I wish to observe. Node numbers can be found by monitoring the output in MQTT Explorer, listening with the MQTT addon or by using the Python CLI withmeshtastic --info.
Additional Nodes
Copy and paste these entities then change name, unique_id, from, and states to create entities from any additional nodes' parameters:
  - name: "Node 2 Messages"
    unique_id: "node_2_messages"
    state_topic: "msh/US/2/json/LongFast/!67ea9400"
    value_template: >-
      {% if value_json.from == 695318008 and value_json.payload.text is defined %}
        {{ value_json.payload.text }}
      {% else %}
        {{ this.state }}
      {% endif %}
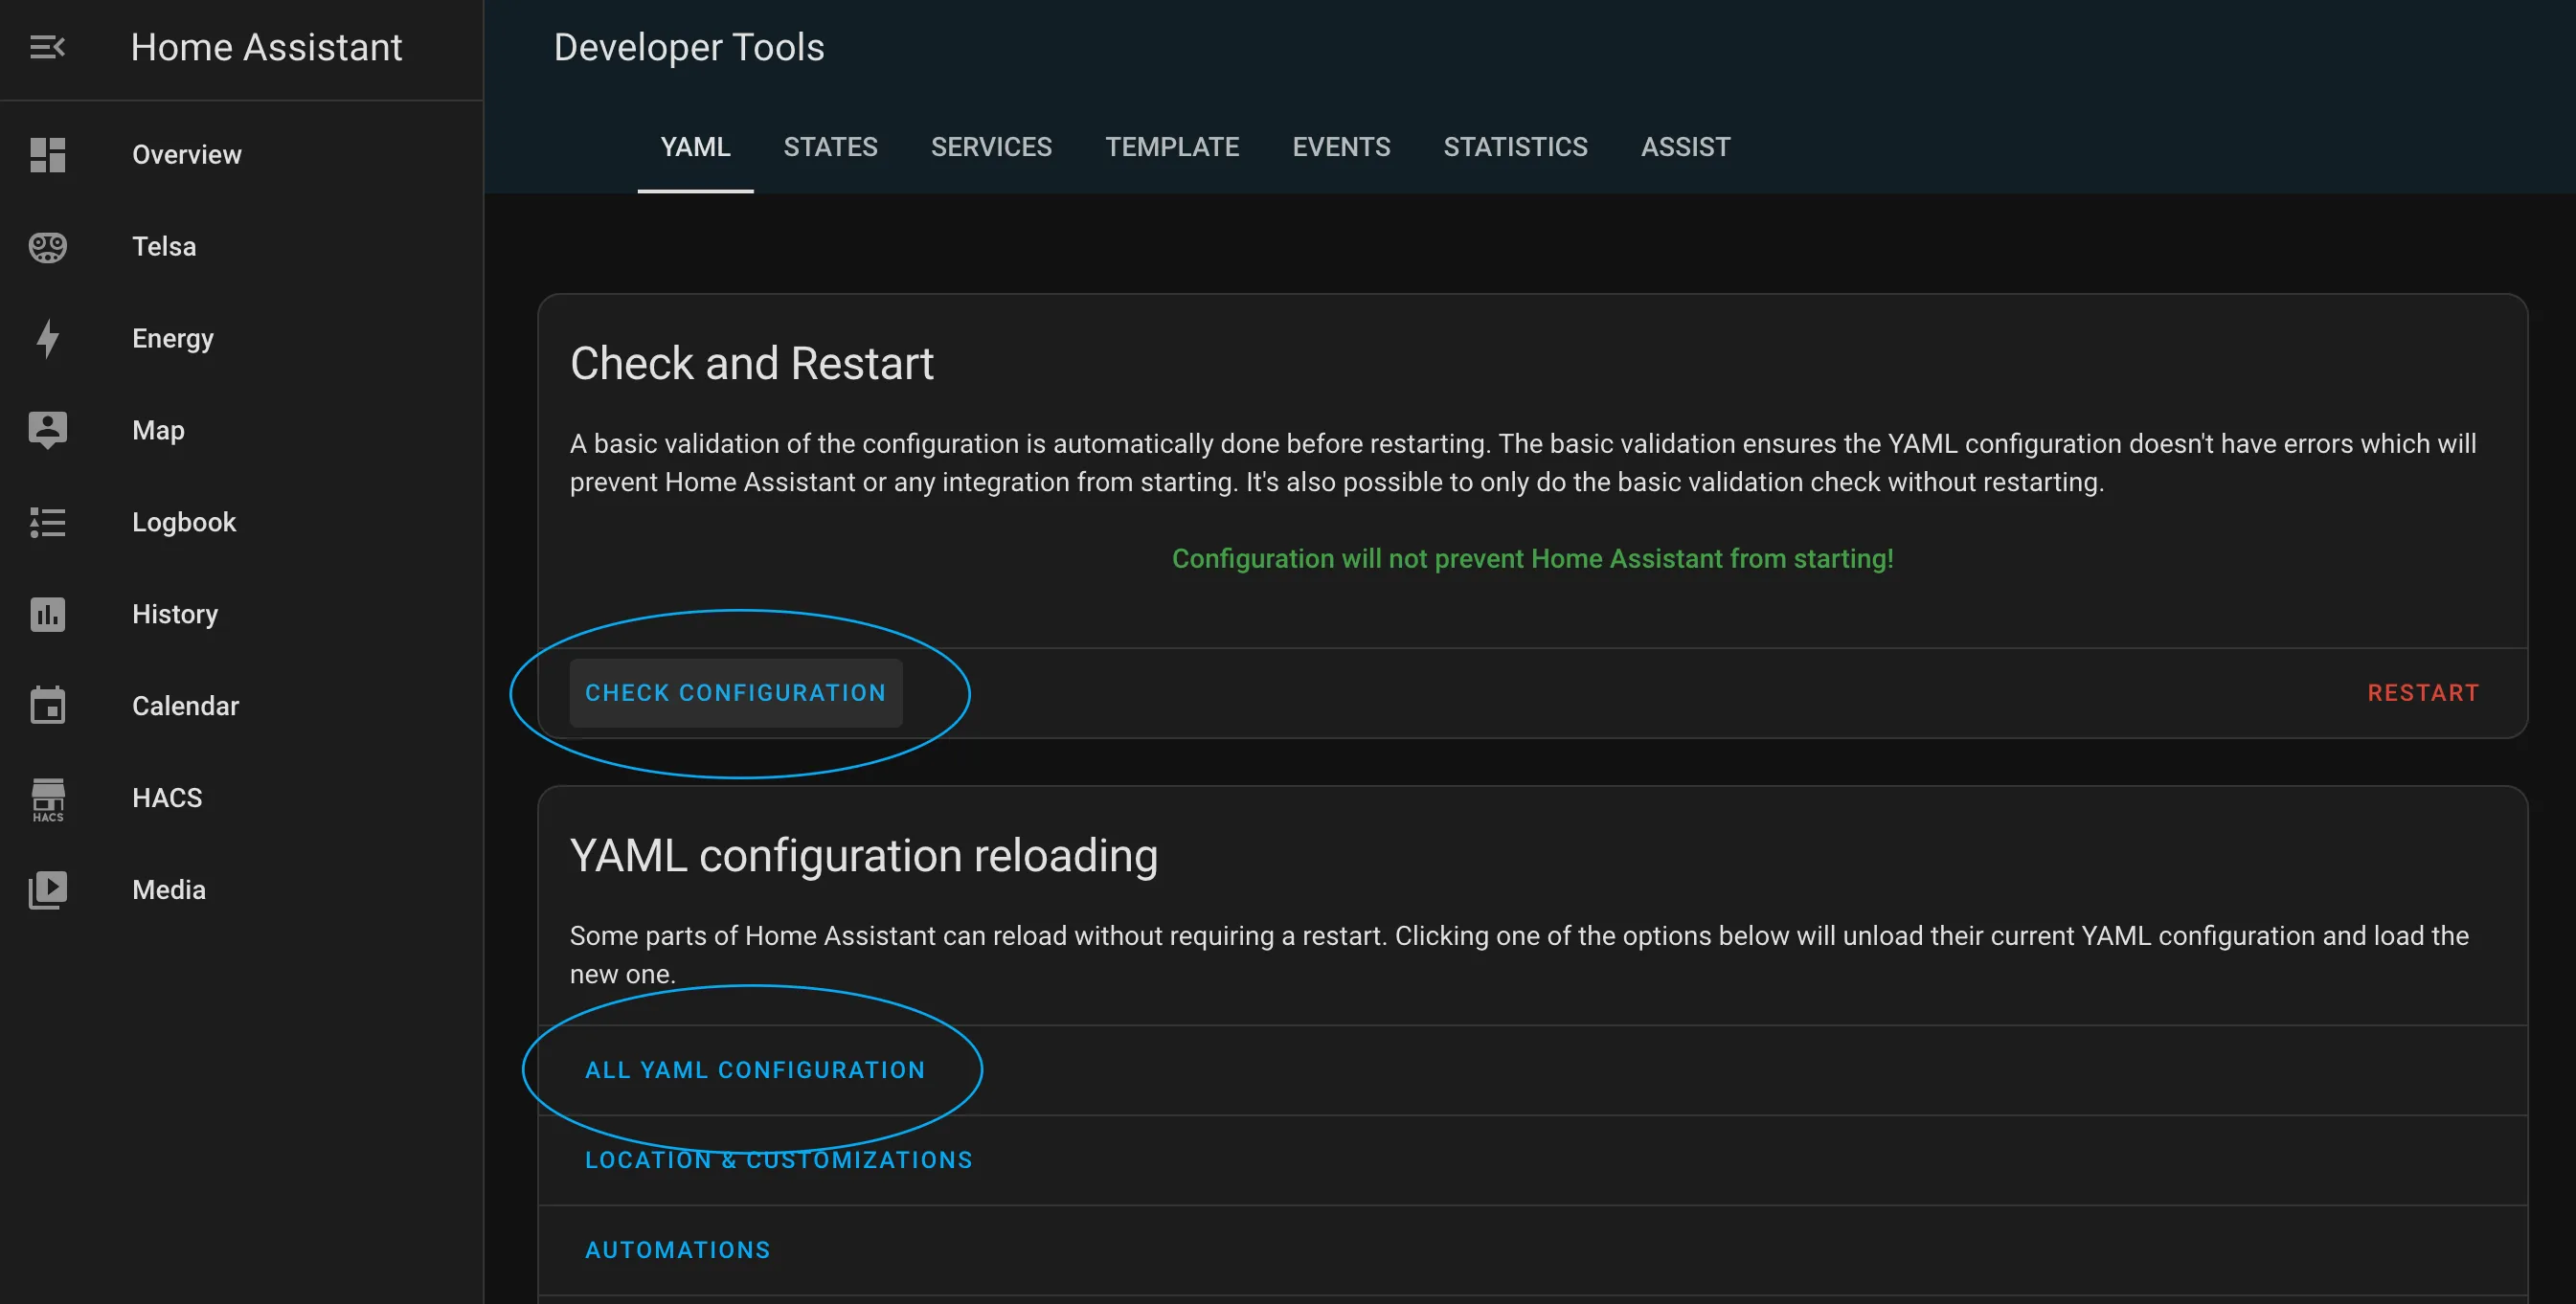
Check Configuration & Reload YAML
- In Home Assistant, run
CHECK CONFIGURATIONin the developer tools section and then reload all yaml configuration.
Always Check Configuration before reloading YAML or restarting Home Assistant to identify errors.
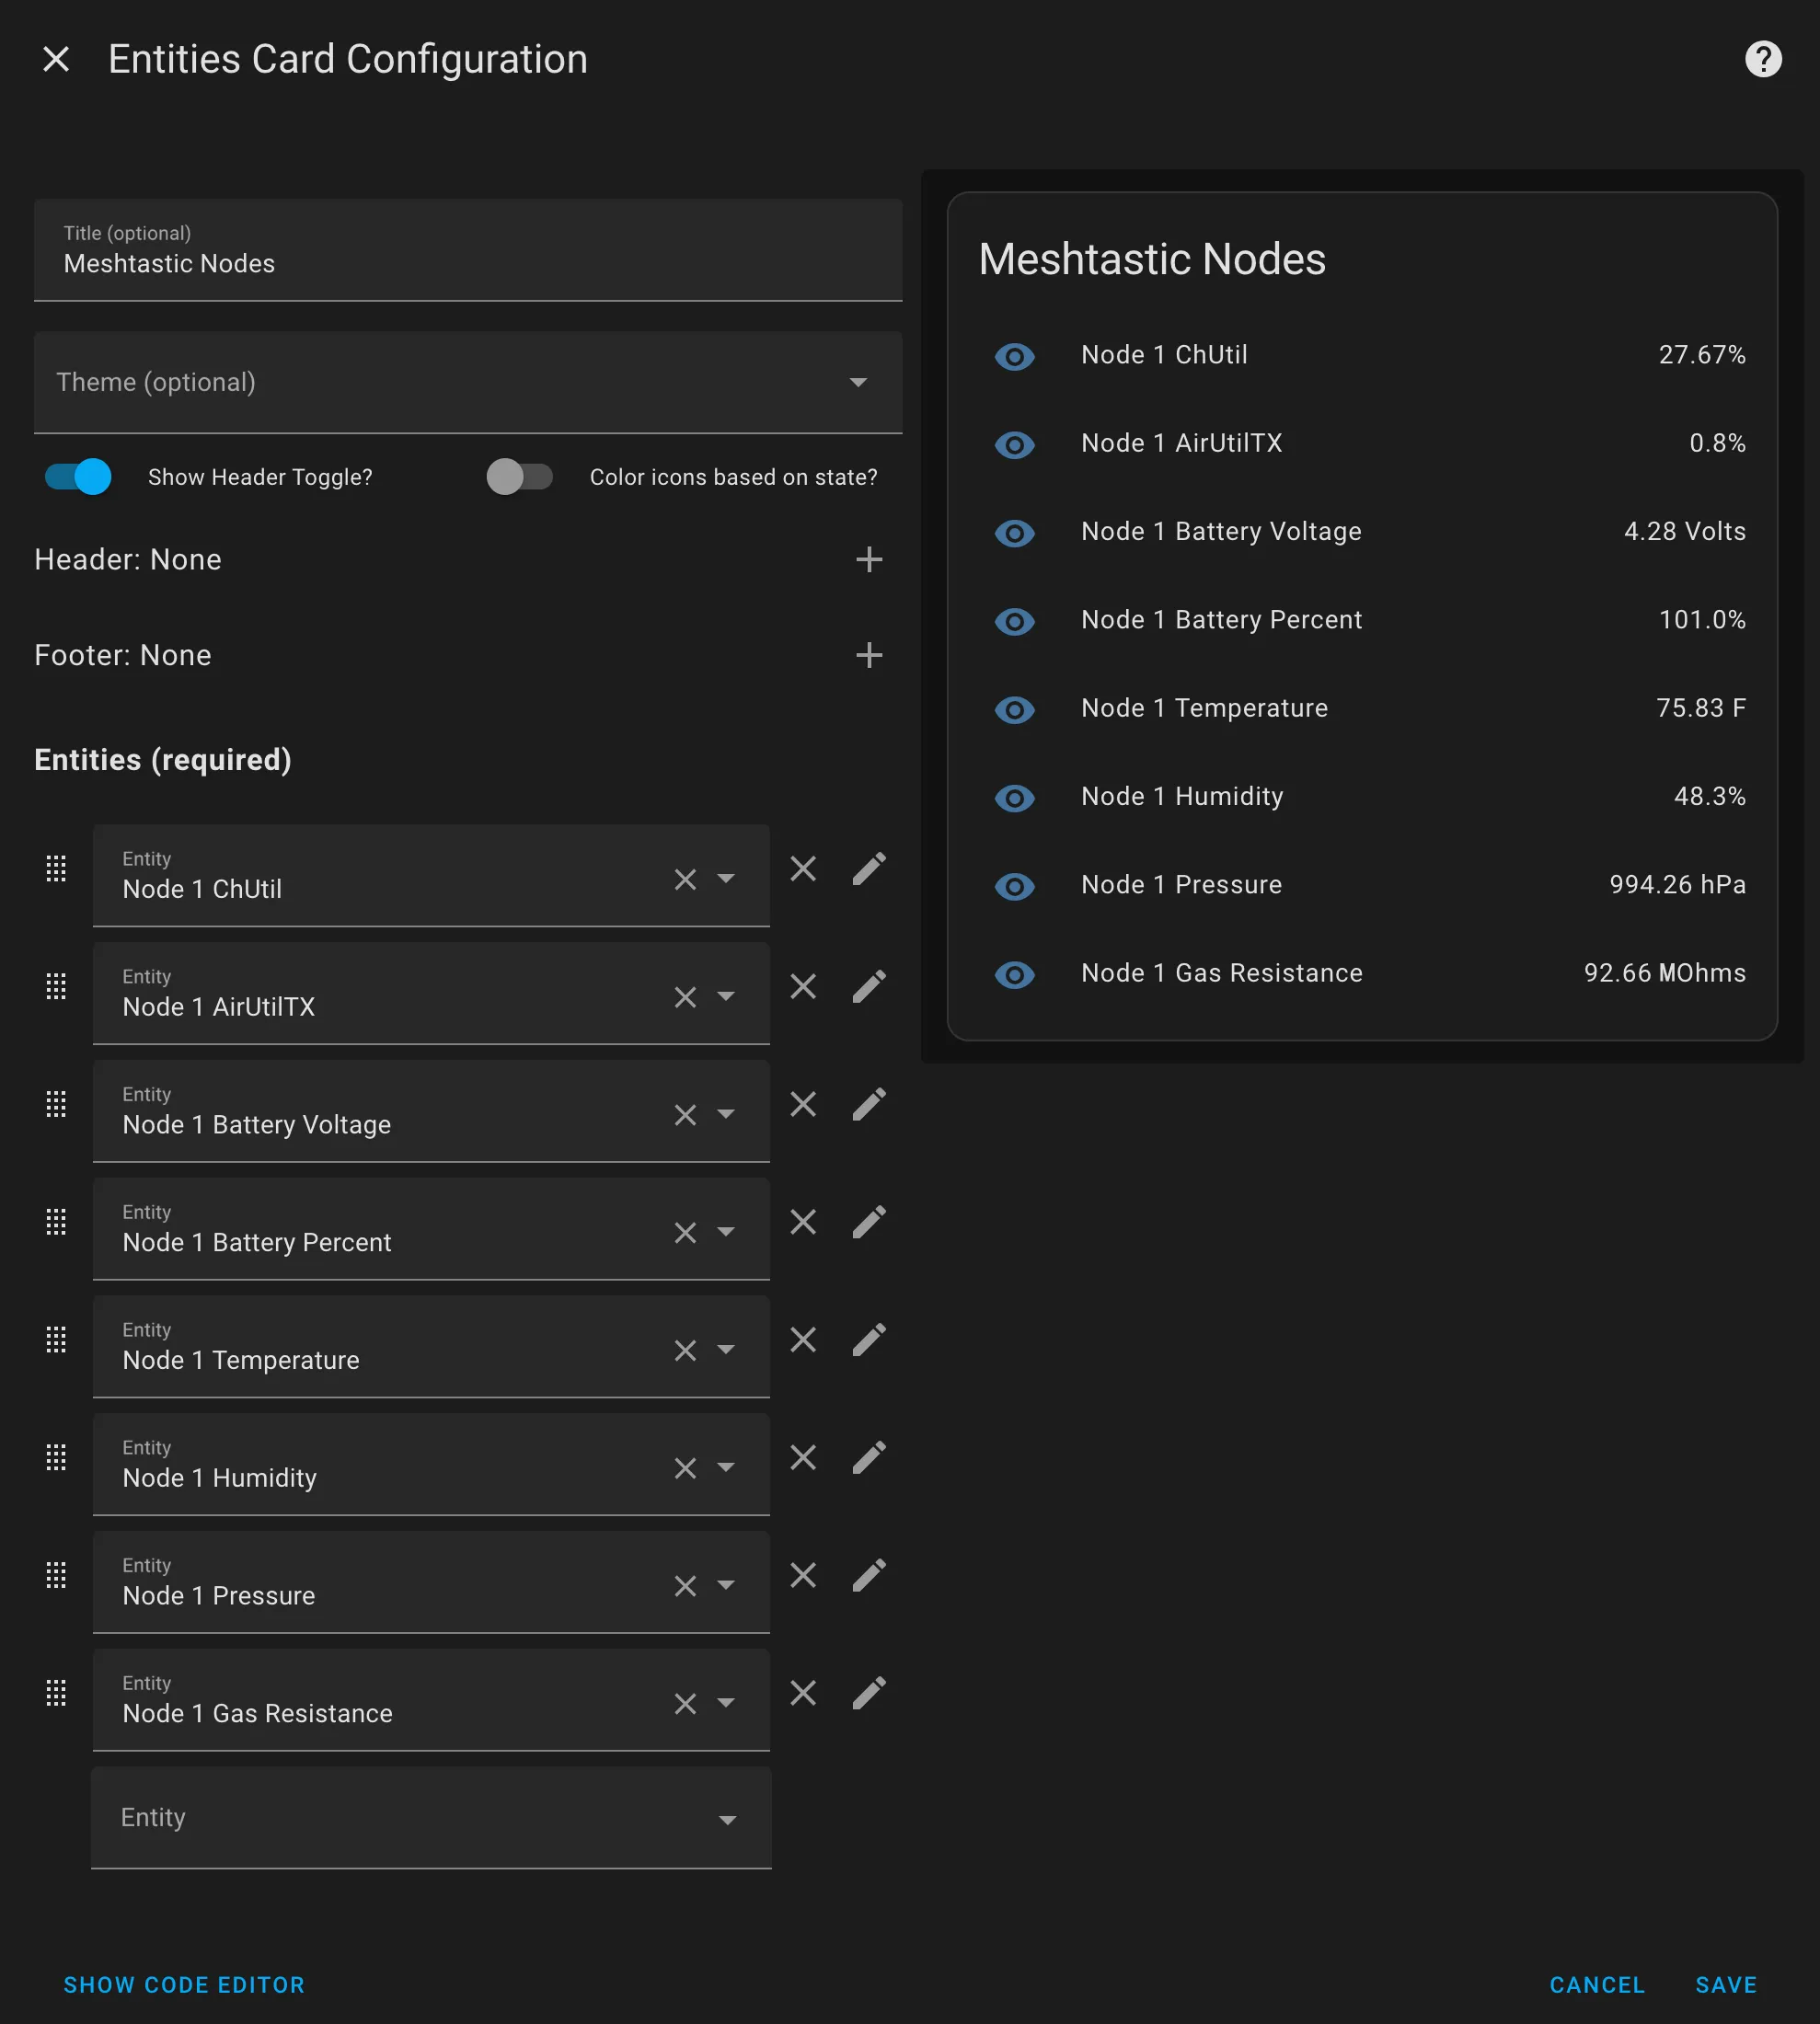
Create Dashboard Cards
Entities Card for Telemetry
Create a new Entities Card and select the entities you have created.
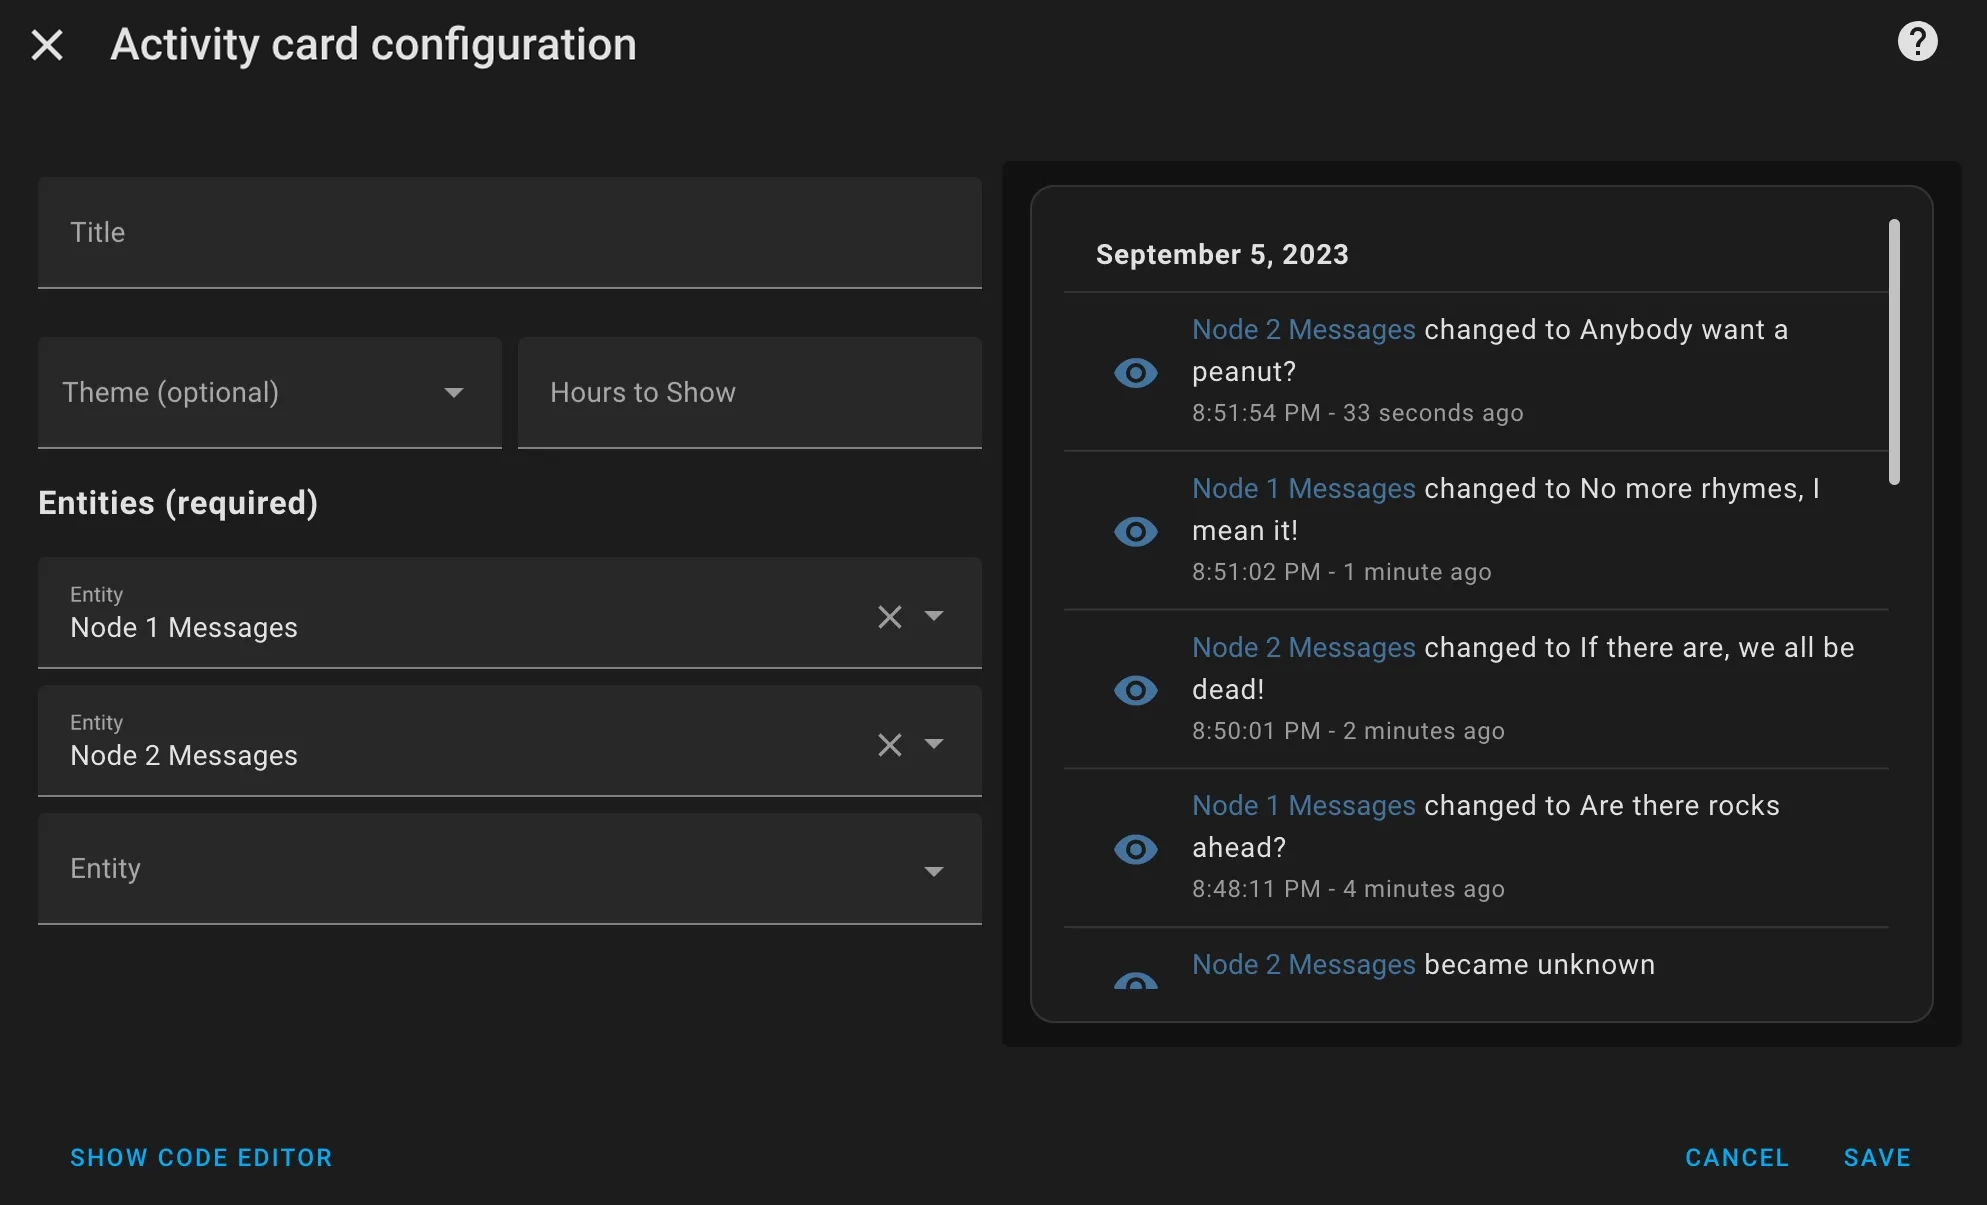
Activity Card for Messaging
The activity card is useful to keep a record of incoming messages from the mesh. Below is an example of how the activity card would be set up.
Trigger HA Automations
It is possible to have Home Assistant trigger automations based on messages or events on your mesh.
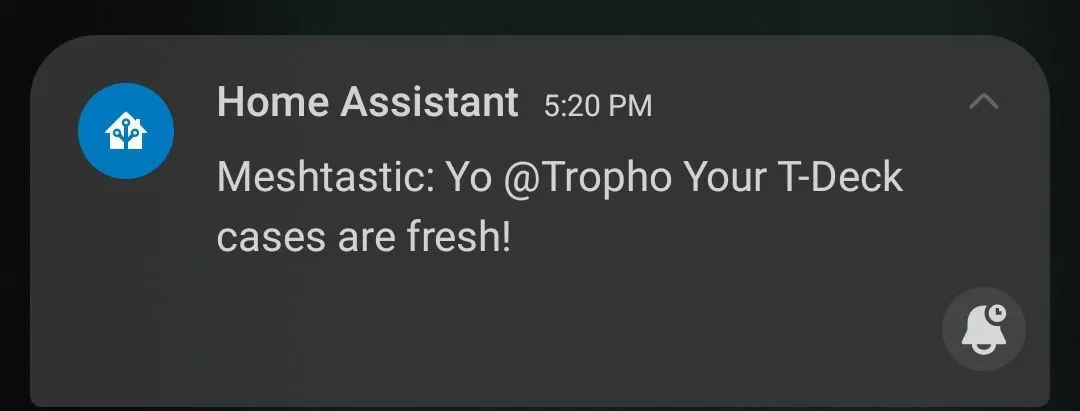
Notifications
This example waits for a message containing @Tropho and then sends a pop-up notification to his flip phone with the message. Optionally you can have ALL messages from the mesh sent as HA notifications to your phone.
Add the following code to your automations.yaml file. Be sure to modify the topic, regex_search, and service for your configuration.
- alias: Meshtastic - New notification
  description: any message with an @Tropho will send to mobile device
  trigger:
    - platform: mqtt
      topic: msh/US/2/json/LongFast/!67ea9400
      value_template: |
        {% if value_json.type == "text" %}on{% endif %}
      payload: "on"
      id: text
      trigger: mqtt
  condition:
    - condition: template
      value_template: "{{ trigger.payload_json.payload.text | regex_search('@Tropho') }}"
    # or send ALL messages from the mesh to HA notifications (except for range tests)
    # value_template: "{{ trigger.payload_json.payload.text is defined and "seq " not in trigger.payload_json.payload.text}}"
      enabled: true
  action:
    - service: notify.mobile_app_trophos_galaxy_z_flip5
      data:
      # show the message as coming from "Meshtastic":
        message: "Meshtastic: {{ trigger.payload_json.payload.text }}"
      # or show the device id instead:
      # message: "{{ trigger.payload_json.from }}: {{ trigger.payload_json.payload.text }}"
    - delay:
        hours: 0
        minutes: 0
        seconds: 30
        milliseconds: 0
  mode: single
This same type of automation is very useful to trigger other actions in Home Assistant. For example, you could turn on a fan when the temperature reaches a certain value, or play a sound on a speaker when a new message is received.
Create a Send Message Entity
It is possible to create an input text box to send messages to your mesh from within Home Assistant.
Input Text Helper Entity
First, create an input text helper entity. The preferred way to configure an input text is via the HA interface at Settings > Devices & Services > Helpers. Click the add button and then choose the Text option. Make a text input helper with a max length of 190 to be on the safe side. See example below:

Create a Send Message Automation
This automation will check the send box for changes. After typing a message, either hit enter or click off the box and the automation will send a text string in JSON to the mqtt broker.
To make this work, ensure that your node has a Meshtastic channel configured called "mqtt" with downlink enabled. The PSK doesn't matter. This channel allows the node to listen to messages on the msh/US/2/json/mqtt/ topic.
Now make sure to publish to the same "mqtt" topic and to update the device ID and from field in the example below. A field channel can be added to transmit on a different channel index than the primary, or a to field can be added with a node number to send a DM.
- alias: Meshtastic - Send Automation
  description: ""
  trigger:
    - platform: state
      entity_id:
        - input_text.meshtastic_send_box
  condition: []
  action:
    - delay:
        hours: 0
        minutes: 0
        seconds: 1
        milliseconds: 0
    - service: mqtt.publish
      data:
        qos: 0
        retain: false
        topic: msh/US/2/json/mqtt/!67ea9400
        payload: >-
          {"from":1743426560,"type":"sendtext","payload":"{{
          states('input_text.meshtastic_send_box') }}"}
    - delay:
        hours: 0
        minutes: 0
        seconds: 1
        milliseconds: 0
    - service: input_text.set_value
      data:
        value: " "
      target:
        entity_id: input_text.meshtastic_send_box
    - delay:
        hours: 0
        minutes: 0
        seconds: 2
        milliseconds: 0
  mode: single
Add this card to your dashboard by going to Edit Dashboard -> + ADD CARD. Then search BY ENTITY for Meshtastic Send Box and check the box next to the entry. Click CONTINUE, then ADD TO DASHBOARD.