Store & Forward Module Settings
Overview
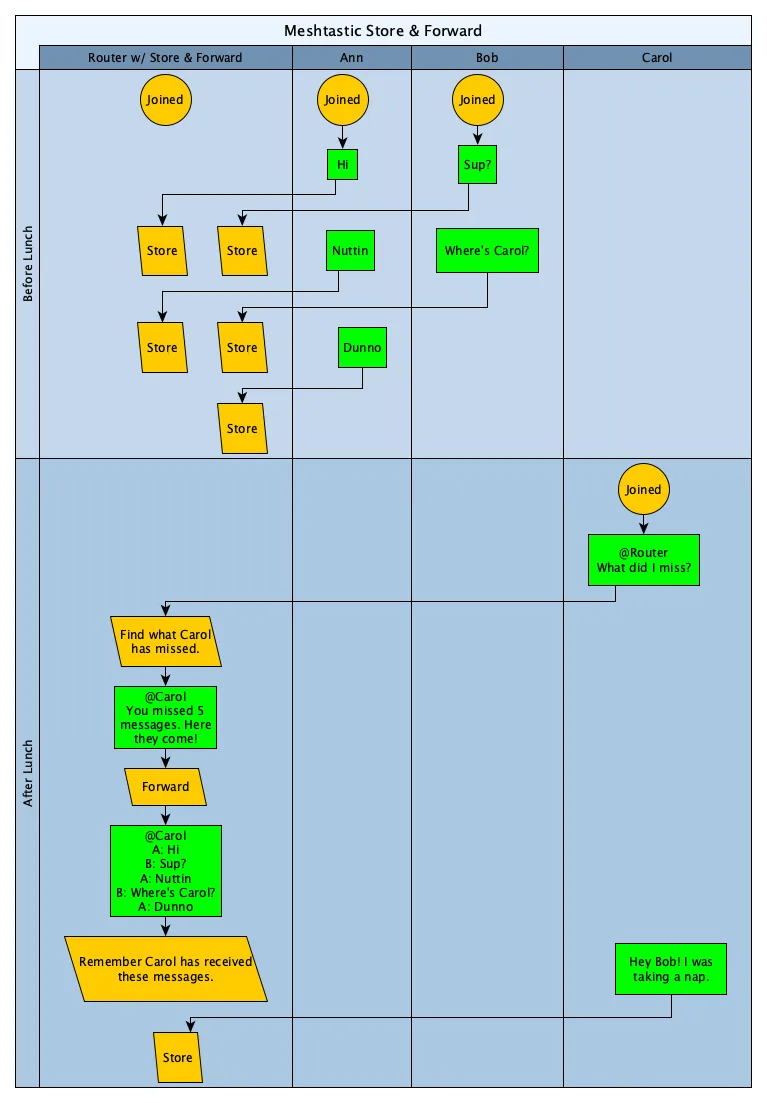
Using this module, a client device can ask a special Store & Forward Server to resend text messages after the client has been temporarily not in LoRa range of the mesh. Since firmware version 2.4, when you connect to the Store & Forward Server with a client app, you get the history automatically, which will be much larger than the default cache of around 30 packets on a device.
Only ESP32 based devices with onboard PSRAM like the T-Beam and T3S3 can be a Store & Forward Server.
When a client device requests the history from the Store & Forward Server, it will resend the text messages over LoRa that it has received. The server will only return messages that are within the time window the client has requested up to the maximum number of messages configured for the server. The server does not know which messages the client device actually missed, so it is possible that you receive duplicates.
Be mindful when requesting the history, as the server might send a lot of messages which will burden your mesh for a short period of time. Requesting history over LoRa is not available on the default public channel.
Details
How it works

Requirements
Initial requirements for the Store and Forward Server:
- Store & Forward Servers are intended to be always online. If this module misses any messages, the reliability of the stored messages will be reduced.
- ESP32 Processor based device with onboard PSRAM (T-Beam > v1.0, T3S3, and maybe others).
Usage Overview
-
To use / test this over LoRa you will want at least 3 devices:
- One ESP32 device with PSRAM configured as
ROUTERorstore_forward.is_serverset. - Two others will be regular clients. If one client sends a text message when the other is not in range, the other can request the history from the server to receive the missed message when it is back in range.
- One ESP32 device with PSRAM configured as
-
To use / test this with a client app you will want at least 2 devices:
- One ESP32 device with PSRAM configured as
ROUTERorstore_forward.is_serverset. - One other device that sends text messages when no app is connected to the Store & Forward Server. When you connect an app to the server, it will automatically retrieve the history.
- One ESP32 device with PSRAM configured as
Server setup
-
Configure your device as a
ROUTERor setstore_forward.is_server true. -
Name your server node something that makes it easily identifiable, e.g. "Base Node (S&F)".
-
Configure the Store and Forward module
Required - Enable the modulemeshtastic --set store_forward.enabled trueOptional - Disable sending heartbeat.meshtastic --set store_forward.heartbeat falsetipBest to disable the heartbeat (which is sent every 15 minutes) to reduce network traffic if you only want to retrieve it by connecting with an app to the server, or when all client devices have identified the server.
Client Usage
Currently implemented in the Android and Apple apps version 2.2.23 and higher. To request the history from the Store & Forward Server, for Android it is required to send it a direct message containing the text "SF" (without quotes). The server will then respond with the requested messages. The Apple apps will also show whether a node is a Store & Forward Server in the node list after it heard the heartbeat. You can then long press the node and select "Client History" to request the history from the server.
Since 2.4, when connecting to the Store & Forward Server itself, the text message history will be automatically retrieved and displayed in the app.
Settings
Enabled
Enables the module.
Heartbeat
The Store & Forward Server sends a periodic message onto the network. This allows connected devices to know that a server is in range and listening to received messages. A client like Android, iOS, or Web can (if supported) indicate to the user whether a Store & Forward Server is available.
History Return Max
Sets the maximum number of messages to return to a client device when it requests the history.
History Return Window
Limits the time period (in minutes) a client device can request.
Records
Set this to the maximum number of records the server will save. Best to leave this at the default (0) where the module will use 2/3 of your device's available PSRAM. This is about 11,000 records.
Is server
Set to true to configure your node with PSRAM as a Store & Forward Server for storing and forwarding messages. This is an alternative to setting the node as a ROUTER and only available since 2.4.
Store & Forward Module Config Client Availability
- Android
- Apple
- CLI
- Web
Android
Store and Forward Config options are available for Android.
- Open the Meshtastic App
- Navigate to: Settings > Store & Forward
Apple
All Store & Forward module config options are available on iOS, iPadOS and macOS at Settings > Module Configuration > Store & Forward.
CLI
| Setting | Acceptable Values | Default |
|---|---|---|
| store_forward.enabled | true, false | false |
| store_forward.heartbeat | true, false | false |
| store_forward.history_return_max | integer | 0 (25 messages) |
| store_forward.history_return_window | integer | 0 (240 minutes) |
| store_forward.records | integer | 0 (≈11,000 records) |
| store_forward.is_server | true, false | false |
Because the device will reboot after each command is sent via CLI, it is recommended when setting multiple values in a config section that commands be chained together as one.
meshtastic --set store_forward.enabled true --set store_forward.history_return_max 0
Examples of CLI Usage
meshtastic --set store_forward.enabled true
meshtastic --set store_forward.enabled false
meshtastic --set store_forward.is_server true
meshtastic --set store_forward.heartbeat 0
meshtastic --set store_forward.history_return_max 0
meshtastic --set store_forward.history_return_max 100
meshtastic --set store_forward.history_return_window 0
meshtastic --set store_forward.history_return_window 1440
meshtastic --set store_forward.records 0
meshtastic --set store_forward.records 100
Web
All Store & Forward module config options are available in the Web UI at Config > Module Config > S&F.